Labels

Tuesday, 23 October 2018

Netscaler Integration with OKTA - SAML


This is unique way to Integrate OKTA with Netscaler without configuring FAS. 
Traffic Flow 

Ø  External facing Citrix URL will be provided to Vendor by ABC-COMPANY Citrix team (It's very simple just select NS module @OKTA and give Internet facing URL. It will populate all required settings)
Ø  URL based configuration at OKTA will be done by Vendor OKTA Or You
Ø  All configurations will be provided by Vendor OKTA Or You
Ø  OKTA certificate will be installed at NetScaler
Ø  SAML authentication Server will be created as per information provided by OKTA
o    From the Configuration page, select NetScaler Gateway > Policies > Authentication > SAML
o    Name: Give the server an easy to understand name.
o    IDP certificate Name: Select the one you imported earlier.
o    Redirect URL*: Enter the value from the View Setup Instructions page from Okta.
o    Single Logout URL: Enter the value from the View Setup Instructions page from Okta.
o    User Field: This should be Name ID unless another identifier is being used. You can verify this by checking a SAML assertion from an Okta SAML test login and look for the login URL name used and you will find where it specifies the nameid-format.
o    Signing Certificate Name: Enter the certificate for your Gateway VIP.
o    Issuer Name: Enter your Gateway VIP URL.
o    Scroll down to the Signature Algorithm section
o    Signature Algorithm: RSA AA-SHA256
o    Digest Method: SHA256
o    SAML Binding: POST
o    Click OK to save the server definition.
o    Back in the SAML section, select the Policies tab, then click Add
o    Enter the following in the Create Authentication SAML Policy form:
o    Name: Give the policy an easy to understand name.
o    Server*: Use the drop down menu to select the Server Entry you just created. Note that it may be added by default if it is the only one.
o    Expression*: Enter ns_true as the value. This enables this policy to always be active when bound to a VIP. A more restrictive expression can be created to allow for more control over when this SAML policy is used and should be based on the customers need.
o    Click OK to save the policy.

Ø  In the left hand tree, select Virtual Servers under NetScaler Gateway section
Ø  Locate the virtual server you wish to bind Okta SAML to.
o    Click Edit.
o    Scroll down to the Authentication section and unbind any existing policies and close the Authentication sub-window.
Ø  Back in the Virtual Server configuration screen, in the Authentication section, select the + (plus) icon on the right hand side of the section title
Ø  In the Choose Policy* option select SAML. In the Choose Type* option select Primary. Click Continue.
Ø  In the Policy Binding section, click the > icon to select the SAML policy you created above. Click the radial button to the left of the policy and click OK (or Select).
Ø  Set the Priority to 100 and click Bind.
Ø  Back at the Virtual Server configuration screen scroll to the end and click on Done.
After this is completed, we need to make a change to this setup. In the setup of the SAML Server (Create Authentication SAML Server) we need to change one setting
Ø  You may have to click on a “More” option to see the “Two Factor” option.
Ø  Bind the LDAP policy to the NSGW VIP. Make sure that you have already bound the SAML policy first, then bind the LDAP policy at the same priority level
Ø  This completes the configuration and you can now test logins.
Now the Okta OIN App need to be created using a Template app which will be created by Vendor\You and ABC-COMPANY Citrix team need to provide NetScaler Gateway URL.
Ø  To enable SSO responder policy need to be created. Inputs for responder policy will be provided by Vendor.
o    POST app Embed link
o    set the Sign On properties
Ø  In the NS configuration go to AppExpert, then Responder,
Ø  Action and a Policy need to be created as per deployment instructions.
Ø  Bind the responder policy with NetScaler Gateway VIP
*Note:  ABC-Company & XYZ-Company are sample names of companies.

Tuesday, 25 September 2018

Citrix Connection Leasing - From Citrix24

As I described this in my previous post in XenDesktop and XenApp 7.x IMA (Independent Management Infrastructure) has been replaced with FMA (Flexcast  Management Infrastructure). For more information see post New features in XenApp and XenDesktop 7.6.  In version 7.6 Citrix introduced as a new feature Connection Leasing to supplement SQL High Availability and in fact provide a similar function as the missing Local Host Cache functionality known from XenApp 6.5.

Connection Leasing definition

It’s important to highlight this point because it’s very important to understand the basic. In Citrix eDocs we can find the following statement:
To ensure that the Site database is always available, Citrix recommends starting with a fault-tolerant SQL Server deployment by following high availability best practices from Microsoft. However, network issues and interruptions may prevent Delivery Controllers from accessing the database, resulting in users not being able to connect to their applications or desktop. The connection leasing feature supplements the SQL Server high availability best practices by enabling users to connect and reconnect to their most recently used applications and desktops, even when the Site database is not available.

Does Connection Leasing replace the Local Host Cache ?

In general we can say: No. On the one hand we know that the primary function of connection leasing is to provide the ability to connect to their resources when Site database is not available. This short definition could be compared to the definition of functionality provided by local host cache. On the other hand we know that connection leasing will allow the connection only to the most recently used resourced and has some more limitations. We know also that due to the IMA construction Local Host Cache provide different set of features which are not available in FMA world. All Connection Leasing limitations will be described later in this article.
To summarize the point – connection leasing is very important feature but due to the limitations is a solution only under some circumstances.

Connection Leasing known limitations

Considering the implementation of connection leasing in your environment make sure you understand the limitations:
  • Connection leasing is supported for server-hosted applications and desktops, and static (assigned) desktops;
  • Connection leasing is not supported for pooled VDI desktops or for users who have not been assigned a desktop when the database becomes unavailable.
  • When the Controller is in leased connection mode:
    • Administrators cannot use Studio, Director, or the PowerShell console.
    • Workspace Control is not available. When a user logs on to Receiver, sessions do not automatically reconnect; the user must relaunch the application.
    • If a new lease is created immediately before the database becomes unavailable, but the lease information has not yet been synchronized across all Controllers, the user might not be able to launch that resource after the database becomes unavailable.
    • Server-hosted application and desktop users may use more sessions than their configured session limits. For example:
      • A session may not roam when a user launches it from one device (connecting externally through NetScaler Gateway) when the Controller is not in leased connection mode and then connects from another device on the LAN when the Controller is in leased connection mode.
      • Session reconnection may fail if an application launches just before the database becomes unavailable; in such cases, a new session and application instance are launched.
    • Static (assigned) desktops are not power-managed. VDAs that are powered off when the Controller enters leased connection mode remain unavailable until the database connection is restored, unless the administrator manually powers them on.
    • If session prelaunch and session linger are enabled, new prelaunch sessions are not started. Prelaunched and lingering sessions will not be ended according to configured thresholds while the database is unavailable.
    • Load management within the Site may be affected. Server-based connections are routed to the most recently used VDA. Load evaluators (and especially, session count rules) may be exceeded.
    • The Controller will not enter leased connection mode if you use SQL Server Management Studio to take the database offline. Instead, use one of the following Transact-SQL statements:
      • ALTER DATABASE <database-name> SET OFFLINE WITH ROLLBACK IMMEDIATE
      • ALTER DATABASE <database-name> SET OFFLINE WITH ROLLBACK AFTER <seconds>

How does Connection Leasing work ?

The simplified connection flow is shown in Figure 1. For detailed explanation for connection flow see the following articles: StoreFront location – in DMZ or Not in DMZ ? or XenDesktop 5 – logon process and communication flow.
Connection steps are the following:
  1. User opens the StoreFront website and enters credentials
  2. StoreFront forwards the credentials
  3. Controler authenticates the user and enumerates available resources in the Site database
  4. User / Receiver receives the response and starts session

Figure 1
The simplified connection flow when Site database is unavailable is shown in Figure 2.
Connection steps are the following:
  1. User opens the StoreFront website and enters credentials
  2. StoreFront forwards the credentials
  3. Controler authenticates the user and tries to enumerate available resources in the Site database. Since Site database is unavailable this step fails and controler returns an error.
  4. User cannot start session

Figure 2
The simplified connection flow with enabled Connection Leasing is shown in Figure 3.
Connection steps are the following:
  1. User is authenticated and Controler 1 enumerates available resources in the Site database
  2. Controler 1 logs the available resources in a local XML file and keep this record for 14 days
  3. XML file is replicated to Controler 2 as part of the next synchronization cycle
Important Note: Each controller talks directly to the site database to get its copy of the leases, they don’t synchronise between each other. In the scenario when database in unavailable (shown in Figure 4) when one controller has a full set of leases and one didn’t, the second controller would not get a copy of the leases from the first controller, it has to wait until the site database is back to get full set of leases.

Figure 3
The simplified connection flow with enabled Connection Leasing when Site database in unavailable is shown in Figure 4.
Connection steps are the following:
  1. User opens StoreFront website and enters credential
  2. Controler detects the DB is unavailable and uses local XML file insted to enumerate available resources in the Site database
  3. User /Receiver receives response and start session

Figure 4

Where the Connection Leasing settings are stored ?

The connection leases entries are kept in Site database, in table chb_State.Leases, (see figure 7 below) but corresponding connection leasing xml files are stored in the hidden folder:  C:\ProgramData\Citrix\Broker\Cache\Leases\Enumeration.
If you are using GPOs to configure your controllers, the GPO will store the configuration details in each controller registry under:
HKLM\Software\Policies\Citrix\DesktopServer\ConnectionLeasing
You should not change the registry values directly if using group policy to configure the settings.
If you are not using a GPO, the configuration is stored under:
HKLM\Software\Citrix\DesktopServer\ConnectionLeasing

How to configure Connection Leasing parameters

The default values used by Connection Leasing should work well with many environments. If you wish to change the default settings you can either:
Note: Connection Leasing does not populate the registry keys by default, so you will need to create them if you wish to change the default values.If you are not using GPOs, in a multi controller site, you will need to edit the registry on each controller.
The used registry settings for Connection Leasing are listed in Table 1 below:

How to verify the status of Connection Leasing ?

Connection leasing is enabled by default but the status can be changed from the PowerShell SDK or the Windows registry. The following PowerShell cmdlets affect connection leasing:
  • Get-BrokerSite – displays the XenDesktop site active configuration details
  • Set-BrokerSite -ConnectionLeasingEnabled $true|$false – turns on/off connection leasing. Default value = $true
  • Get-BrokerServiceAddedCapability – displays  “ConnectionLeasing” for the local Controller.
  • Get-BrokerLease – retrieves either all or a filtered set of current leases.
  • Remove-BrokerLease – marks either one or a filtered set of leases for deletion.
  • Update-BrokerLocalLeaseCache – updates the connection leasing cache on the local Controller.
The example of powershell cmdlet output is shown in Figure 5 and 6
cl_5
Figure 5
cl_6
Figure 6
The content of  chb_State.Leases table is shown in Figure 7
cl_7
Figure 7
The content of connection lease xml file is shown in Figure 8
cl_9
Figure 8

Questions to be answered

  1. Where Connection Leasing default settings are stored ? – In the first 7.6 installation in my LAB the registry key mentioned above is empty.
Update 2014.11.14: Default values are hard coded and do not exist in registry. If registry entry is created, new value will be used to overwrite the default setting. Many thanks to Joe Deller for clarifying this.
  1. Where association to server hosting the application is stored ? – Using connection leasing, when database is unavailable user will always be routed to the server used when lease was created.
Update 2014.11.04: in the hidden folder Cache the is a collection folders shown in Figure 9. In the the folder Workers there are a random folders created for each user with xml file. An example of a xml file is presented in Figure 10. XML files located in his folder are used to link configured worker to user lease / user id as it is shown in Figure 11. Information about user id is shown in Figure 6 as Owner ID.
Update 2014.11.12:
By default, leases files are stored in subdirectories in %programdata%\Citrix\Broker\Cache:
Apps – contains information about published applications, one file per published app per delivery group; as such this subdirectory should remain relatively small in terms of size and number of objects.
Desktops – contains an entry per user VDA, in a VDI environment this will be one for every user assigned VDI desktop, or in a RDS worker, one entry per published desktop. A VDI environment will therefore normally require much more disk space than a RDS environment as there is a one to one mapping between users and their assigned desktop, rather than the many users to one RDS host desktop.
Icons – will have one entry per unique published application and one for desktops. Normally desktops share one standard icon, unless otherwise configured. If a published application shares the same base executable as another, only one icon entry will be created. Icons will tend to be larger than lease files as they contain the raw bitmap information on how to draw the icon for the application or desktop, but this should still only be in the hundreds of K for a typical icon.
Leases\Enumeration – contains an entry about the resources available to each user, one per user. The size of the file will depend on the number of resources (applications and desktops) available to the user.
Leases\Launch – contains an entry for each successful user VDA login, one for each desktop that the user is entitled to (and has launched) and one for applications. Only a single application lease file is created no matter how many are available to the user as session sharing will normally direct the user to the same host in normal operations. The user can launch any app published from a delivery group from which they have previously launched an app – even if it’s not the same one. It is possible that the enumeration lease might include details of apps/desktops that are no longer available to the user, for example in a scenario where the controller or desktop that hosts the resources is unavailable, there is no load balancing active during Connection Leasing, only the previously connected host will be used.
Workers – contains one entry per VDA, so as per the Desktops directory, a VDI environment will generally contain more lease files than a RDS one; each assigned desktop has data associated with the user, rather than the many users accessing the same RDS host.
The location of the leases can be changed by modifying a registry key, details of which are found at the end of this ocument.
cl_12
Figure 9
cl_10
Figure 10
cl_11
Figure 11

Tuesday, 17 July 2018

Citrix 7.15 Local Host Cache (LHC)

With the release of XenDesktop 7.12 Citrix has introduced into FMA world Local Host Cache functionality. Since 2013 when XenDesktop 7.0 without LHC was released this feature was the most awaited change. Taking the opportunity that quite recently I started some test of XenDesktop 7.15 in my LAB I would like to write down my notes about local host cache. Let’s start from the beginning …
Update: Added detailed information about localDB import process

Function

The main function of Local Host Cache is to allow all users to connect/reconnect to all published resources during database outage. In FMA world, Local Host Cache functionality is the next step to successfully implement stable, truly highly-available XenApp and XenDesktop 7.15 infrastructure. The first solution to enable HA is connection leasing introduced in XenDesktop 7.6. For more details see my post: Connection Leasing.   The implementation history is presented in the Table 1 below.
(*) Depends on the installation type.
The following table shows the Local Host Cache and connection leasing settings after a new XenApp or XenDesktop installation, and after an upgrade to XenApp or XenDesktop 7.12 (or later supported version).

LHC comparison:  XenDesktop 7.15 vs XenApp 6.5

Although Local Host Cache implementation in XenDesktop 7.15 (to be more precise,  from version 7.12) shares the name of the Local Host Cache feature in XenApp 6.x, there are significant differences which you should be aware of. My subjective pros and cons summary is the following:
Advantages:
  • LHC is supported for on-premise and Citrix Cloud installations
  • LHC implementation in XenDesktop 7.15 is more robust and immune to corruption
  • Maintenance requirements are minimized, such as eliminating the need for periodic dsmaint commands
Disadvantages:
  • Local Host Cache is supported for server-hosted applications and desktops, and static (assigned) desktops; it is not supported for pooled VDI desktops (created by MCS or PVS).
  • No control on Secondary Broker election – election is done based on alphabetical list of FQDN names of registered Delivery Controllers. Election process is described in details below.
  • Additional compute resources in the sizing for all Delivery Controllers must be included.

Local Host Cache vs Connection leasing – highlights

  • Local Host Cache was introduced to replace Connection Leasing, which will be removed in the next releases !
  • Local Host Cache supports more use cases than connection leasing.
  • During outage mode, Local Host Cache requires more resources (CPU and memory) than connection leasing.
  • During outage mode, only a single broker will handle VDA registrations and broker sessions.
  • An election process decides which broker will be active during outage, but does not take into account broker resources.
  • If any single broker in a zone would not be capable of handling all logons during normal operation, it won’t work well in outage mode.
  • No site management is available during outage mode.
  • A highly available SQL Server is still the recommended design.
  • For intermittent database connectivity scenarios, it is still better to isolate the SQL Server and leave the site in outage mode until all underlying issues are fixed.
  • There is a limit of 10 000 VDAs per zone.
  • There is no 14-day limit.
  • Pooled desktops are not supported in outage mode, in the default configuration.
In the overall assessment we would say that Citrix has achived one of the biggest milestones in XenDesktops 7.x releases. The current implementation is far from ideal solution but changes are going in the right direction. Additional improvements to LHC are still required to provide enterprise-wide high availablity feature for database outages.

How to turn it on ?

Status of HA options can be checked with powershell command: Get-BrokerSite. See the screenshot below:

Figure 1 – LHC status
To change the status of HA options you can use Set-BrokerSite command. 
To enable Local Host Cache (and disable connection leasing), enter:
Set-BrokerSite -LocalHostCacheEnabled $true -ConnectionLeasingEnabled $false
To disable Local Host Cache (and enable connection leasing), enter:
Set-BrokerSite -LocalHostCacheEnabled $false -ConnectionLeasingEnabled $true

How does it work ?

Local Host Cache functionality in FMA world is build based on 3 core FMA services and MS SQL Express localDB:
  • Citrix Broker Service  – called also Principal Broker Service. In windows server operating system is represented as service as process BrokerService. In scope of local host cache functionality Principal Broker service is responsible for the following tasks:
    • registration of all VDAs, including ongoing management from a Delivery Controller perspective
    • brokers new and manages existing sessions, handles resource enumeration, the creation and verification of STA tickets, user validation, disconnected sessions etc
    • monitoring existence of site database
    • monitoring of changes in site database
  • Citrix Config Synchronizer Service – In windows server operating system is represented as process ConfigSyncService. The main tasks served by this service are the following:
    • when a configuration change in site database is detected, copy the content of site database to the High Availability Service/Secondary Broker Service
    • provide the High Availability Service/Secondary Broker Service (s) with information on all other controllers within your Site (Primary Zone), including any additional Zones
  • Citrix High Availability Service – called also Secondary Broker Service. In windows server operating system is represented as process HighAvailabilityService. The main task served by this service is to handle all new and existing connections/sessions during database outage.
  • MS SQL Express LocalDB – dedicated SQL Express instance located on every controller used to store all site information data synchronised from Site database. Ony the secondary broker communicates with this database; you cannot use PowerShell cmdlets to change anything about this database. The LocalDB cannot be shared across Controllers.

Process flow during normal operations

  • The principal broker (Citrix Broker Service) on a Controller accepts connection requests from StoreFront, and communicates with the Site database to connect users with VDAs that are registered with the Controller. In the background Broker is monitoring database status.  A heartbeat message is exchanged between a Delivery Controller and the database every 20 seconds with a default timeout of 40 seconds.
  • Every 2 minutes a check is made to determine whether changes have been made to the principal broker’s configuration. Those changes could have been initiated by PowerShell/Studio actions (such as changing a Delivery Group property) or system actions (such as machine assignments). It will not include information about who is connected to which server (Load Balancing), using what application (s) etc. referred as the current state of the Site/Farm
    • If a change has been made since the last check, the principal broker uses the Citrix Config Synchronizer Service (CSS) to synchronize (copy) information to a secondary broker (Citrix High Availability Service) on the Controller.
    • The secondary broker imports the data into a temporary database (HAImportDatabaseName) in Microsoft SQL Server Express LocalDB on the Controller.
    • When import into temporary DB  is successful, previous DB is removed and temporary DB is renamed to HADatabaseName.  The LocalDB database is re-created each time synchronization occurs. The CSS ensures that the information in the secondary broker’s LocalDB database matches the information in the Site database. Correlated event ids:
      • id 503 – CSS receives a config change
      • id 504 – LocalDB update successfull
      • id 505 – LocalDB update failure
    • If no changes have occurred since the last check, no data is copied
Standard LHC process flow is presented in the figure below:
Figure 2 – LHC standard mode

Process flow during database outage

  • The principal broker can no longer communicate with the Site database
    • The principal broker stops listening for StoreFront and VDA information (marked with red X in the figure below). Correlated event ids: 1201, 3501
    • The principal broker then instructs the secondary broker (High Availability Service) to start listening for and processing connection requests (marked with a red dashed line in the figure below).  Correlated event ids: 2007, 2008
    • Based on alphabetical list of FQDN names an election process starts to determine which controller takes over the secondary broker role. There can only be one secondary broker accepting connections during database outage. Correlated event id: 3504. The non-elected secondary brokers in the zone will actively reject incoming connection and VDA registration requests.
    • While the secondary broker is handling connections, the principal broker continues to monitor the connection to the Site database
    • As soon as a VDA communicates with Secondary Broker, a re-registration process is triggered (shown with red arrows for XML and VDA registration traffic in the figure below). During that process, the secondary broker also gets current session information about that VDA. Correlated event ids: 1002, 1014, 1017
  • Connection is restored,
    • The principal broker instructs the secondary broker to stop listening for connection information, and the principal broker resumes brokering operations.  Correlated event ids: 1200-> 3503-> 3500, 3004-> 3000-> 1002
    • The secondary broker removes all VDA registration info captured during the outage (these information are lost and are not synchronized to Site database) and resumes updating the LocalDB database with configuration changes received from the CSS.
    • The next time a VDA communicates with the principal broker, a re-registration process is triggered.
LHC process flow during database outage is presented in the figure below:

Figure 3 – LHC outage mode

Sites with multiple controllers and zones

As it was mentioned above Config Synchronizer Service updates the secondary broker with information about all Controllers in the site or zone. If your deployment does contain multiple zones, this action is done per each zone independently and affects all Controllers in every zone.  Having that information, each secondary broker knows about all peer secondary brokers.
In the deployment with single zone configuration (or with multiple zones but controllers configured with single zone) election is done based on FQDN names of all configured controllers

Figure 4 – Single zone

Figure 5 – Election in single zone deployment

In the deployment with multiple zones configured with delivery controllers election is done separately per each zone based on FQDN names of configured controllers.

Figure 6 – Multiple zones

Figure 7 – Election in the first zone

Figure 8 – Election in the second zone

SQL Express LocalDB

LocalDB is an instance of SQL Server Express that can create and open SQL Server databases. The local SQL Express database has been part of the XenApp/XenDesktop installation as of version 7.9. It is installed automatically when you install a new controller or upgrade a controller prior to version 7.9.
The binaries for SQL Express LocalDB are located in:
%ProgramFiles%\Microsoft SQL Server\120\LocalDB\.
The LHC database files are located in folder as:
C:\Windows\ServiceProfiles\NetworkService\HaDatabaseName.mdf.
C:\Windows\ServiceProfiles\NetworkService\HaDatabaseNamelog.ldf.
During every import process temporary database is created
C:\Windows\ServiceProfiles\NetworkService\HaImportDatabaseName.mdf.
C:\Windows\ServiceProfiles\NetworkService\HaImportDatabaseNamelog.ldf.
Local Host Cache database contains only static information, referred as the current state of the Site/Farm. In multizone scenario local host cache database in all zones contains exactly the same set of information.
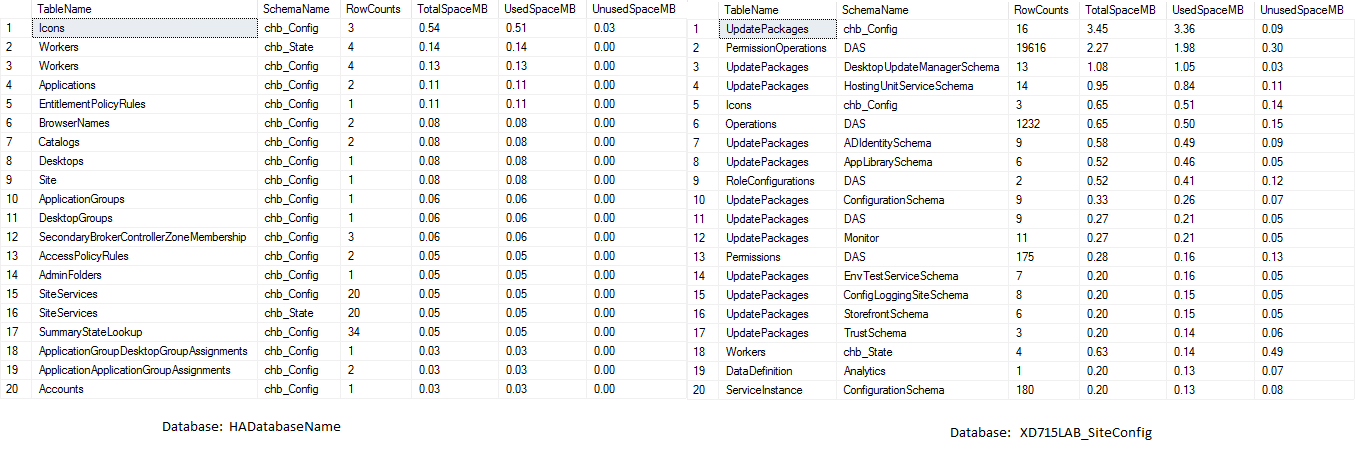
The size comparison of top 20 biggest tables is shown in the figure below:
LocalDB is exclusively used by the secondary broker.  PowerShell cmdlets or Citrix studio cannot be used to communicate with /update this database. The LocalDB cannot be shared across Controllers. Each controller has each own copy of Site database content.

Design considerations

The following must be considered when using local host cache:
  • Elections – When the zones loses contact with the SQL database, an election occurs nominating a single delivery controller as master. All remaining controllers go into idle mode. A simple alphabetical order determines the winner of the election (based on alphabetical list of FQDN names of registered Delivery Controllers).
  • Sizing – When using local host cache mode, a single delivery controller is responsible for all VDA registrations, enumerations, launches and updates. The elected controller must have enough resources (CPU and RAM) to handle the entire load for the zone. A single controller can scale to 10,000 users, which influences the zone design.
    • RAM – The local host cache services can consume 2+GB of RAM depending on the duration of the outage and the number of user launches during the outage where
      LocalDB service can use approximately 1.2 GB of RAM (up to 1 GB for the database cache, plus 200 MB for running SQL Server Express LocalDB).
      The High Availability Service can use up to 1 GB of RAM if an outage lasts for an extended interval with many logons occurring
    • CPU – The local host cache can use up to 4 cores in a single socket. Combination multiple sockets with multiple cores should be considered to provide expected performance. Based on Citrix testing, a 2×3 (2 sockets, 3 cores) configuration provided better performance than 4×1 and 6×1 configurations.
    • Storage – During local host cache mode, storage space increased 1MB every 2-3 minutes with an average of 10 logons per second.  When connectivity to site database is restored the local database is recreated and the space is returned. However, the broker must have sufficient space on the drive where the LocalDB is installed to allow for the database growth during an outage. Extended I/O requirements during database outage should be considered as well.
    • Power Options – Powered off virtual resources will not start when the delivery controller is in local host cache mode. Pooled virtual desktops that reboot at the end of a session are placed into maintenance mode.
  • Consoles – When using local host cache mode, Studio and PowerShell are not available.
  • VDI limits:
    • In a single-zone VDI deployment, up to 10,000 VDAs can be handled effectively during an outage.
    • In a multi-zone VDI deployment, up to 10,000 VDAs in each zone can be handled effectively during an outage, to a maximum of 40,000 VDAs in the site.

Monitoring

When preparing a dedicated template for XenDesktop 7.15 monitoring the event logs items listed in the table below should be considered.

Tests and Troubleshooting

Force an outage

You might want to force a database outage when
  • If your network is going up and down repeatedly. Forcing an outage until the network issues resolve prevents continuous transition between normal and outage modes.
  • To test a disaster recovery plan.
  • While replacing or servicing the site database server.
To force an outage, edit the registry of each server containing a Delivery Controller.
  • In HKLM\Software\Citrix\DesktopServer\LHC, set OutageModeForced to 1. This instructs the broker to enter outage mode, regardless of the state of the database.  (Setting the value to 0 takes the server out of outage mode.)
  • In a Citrix Cloud scenario, the connector enters outage mode, regardless of the state of the connection to the control plane or primary zone

Troubleshooting

As usual the main source of information about the status of Local Host Cache is the Windows Event Viewer. All actions done by LHC components are are logged to Windows Server Application log. The examples of the most important events are presented in figures below.

Delivery Controller

Event ID: 503 and 504 – LHC configuration change and update
Event ID: 503 – deatils 
Event ID: 1201 and 3501 – Site database connection lost

Event ID: 1201 – deatils 
Event ID: 3504 – deatils 
Event ID: 3501 – deatils 
Event ID: 3502 – deatils 
Event ID: 3503 – Site database connection restore
Event ID: 3500 – Site database connection restore

VDA

Event IDs in VDA are using slightly different notation. Although in event log viewer, event ids are displayed as 1001 and 1010 real values are stored as 1073742834 and 3221226473 respectively.
Event ID: 3500 / 1073742834 – details

Event ID: 3500 / 3221226473 – details

How To Build IT Operations Future Ready

 IT Operations is most critical piece in every organization. Without appropriate mindset, tools and policy  it's a nightmare for any org...